For Bitdefender Login Account Click on Login Button
.png)
Setting up a Bitdefender account is a crucial step in protecting your digital life from a myriad of online threats. Bitdefender, a renowned name in the cybersecurity industry, offers a comprehensive range of products designed to secure your devices and data. This guide will walk you through the "Step-by-Step: Bitdefender Login Account Setup" process to ensure you can maximize the security benefits offered by Bitdefender.
Why You Need a Bitdefender Account
Before diving into the setup process, it's essential to understand why a Bitdefender account is necessary. With a Bitdefender account, you can:
- Manage all your Bitdefender products from a single dashboard.
- Access Bitdefender Central, the platform where you can download products, check your subscription status, and get support.
- Receive real-time notifications about potential threats and security updates.
- Remotely manage your devices, including performing scans and updates.
Step 1: Visit the Bitdefender Website
The first step in the "Step-by-Step: Bitdefender Login Account Setup" is to visit the Bitdefender website. Open your preferred web browser and go to www.bitdefender.com. This is where you will begin the process of creating your account.
Step 2: Access Bitdefender Central
Once on the Bitdefender homepage, locate and click on the “Central” link. Bitdefender Central is the web-based platform where you can manage your account and devices. Alternatively, you can directly visit central.bitdefender.com.
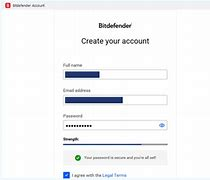
Step 3: Create Your Account
On the Bitdefender Central page, you will see options to either log in or create a new account. Since this guide focuses on setting up a new account, click on the “Create Account” button. You will be prompted to enter your email address and create a password. Ensure that your password is strong and unique to enhance your account's security.
Step 4: Verify Your Email
After filling out the required information, Bitdefender will send a verification email to the address you provided. Check your inbox (and spam folder, just in case) for an email from Bitdefender. Click on the verification link within the email to confirm your account. This step is crucial as it validates your identity and ensures you have access to the provided email address.
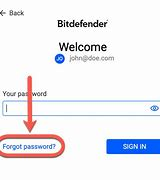
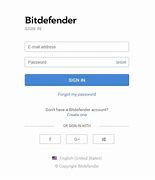
Step 5: Log In to Bitdefender Central
With your account verified, return to the Bitdefender Central login page. Enter your email address and password to log in. You are now ready to start using your Bitdefender account to manage your cybersecurity needs.
Step 6: Setting Up Your Bitdefender Products
Now that you have successfully logged into your Bitdefender account, the next step is to set up your Bitdefender products. If you have already purchased a Bitdefender product, you will have received a license key. "Bitdefender Login Account"
- Navigate to the “My Subscriptions” section: This is where you can manage your product licenses.
- Click on “Activate with code”: Enter your license key in the provided field and click “Activate”. This will link your Bitdefender product to your account.
- Download and Install the Product: Once your license is activated, you can download the Bitdefender product. Follow the on-screen instructions to install it on your device.
Step 7: Configuring Security Settings
After installing Bitdefender on your device, it's essential to configure your security settings to suit your needs. Bitdefender offers a range of customizable options:
- Real-time protection: Ensure that real-time protection is enabled to continuously monitor your device for threats.
- Scheduled scans: Set up regular scans to automatically check your device for malware and other security issues.
- Parental controls: If you have children, use the parental control features to monitor and restrict their online activities.
- Privacy settings: Configure privacy settings to protect your personal information from unauthorized access.
Step 8: Explore Bitdefender Central Features
Bitdefender Central offers several features to help you manage your cybersecurity:
- Device management: View and manage all devices linked to your Bitdefender account.
- Security reports: Access detailed reports on your device’s security status and recent threats.
- Remote access: Perform remote scans and updates on your devices from anywhere.
- Support: Get help from Bitdefender’s support team directly through Bitdefender Central.
Step 9: Keeping Your Account Secure
Your Bitdefender account holds sensitive information about your devices and security settings. Therefore, it's crucial to keep your account secure:
- Use a strong, unique password: Avoid using easily guessable passwords. Consider using a password manager to generate and store complex passwords.
- Enable two-factor authentication (2FA): This adds an extra layer of security by requiring a second form of verification, such as a code sent to your phone, when logging in.
- Regularly update your information: Ensure your contact details are up-to-date in case Bitdefender needs to contact you regarding your account.
Step 10: Stay Informed About Updates
Bitdefender continuously updates its products to protect against new threats. Stay informed about these updates:
- Check for software updates: Regularly check Bitdefender Central for updates to your security products.
- Subscribe to notifications: Opt-in for email notifications to receive alerts about critical security updates and news.
- Read the Bitdefender blog: Stay informed about the latest cybersecurity trends and tips by reading the Bitdefender blog.
Conclusion
Setting up a Bitdefender Login Account is a straightforward process that significantly enhances your cybersecurity posture. By following this "Step-by-Step: Bitdefender Login Account Setup" guide, you ensure that your devices and data are well-protected against the ever-evolving landscape of online threats. Remember, a secure account is the first line of defense in safeguarding your digital life.